How to Integrate The Security Bulldog into Your Cybersecurity Jira Tickets
Want to simplify your cybersecurity workflows? Integrating The Security Bulldog with Jira can save time and streamline your threat management process. This AI-powered platform processes vast amounts of cybersecurity data daily, turning it into actionable insights. By linking it to Jira, you can automatically create and manage security tickets, prioritize threats, and reduce manual effort.
Key Takeaways:
- What it does: The Security Bulldog uses AI to process threat data, offering tools like MITRE ATT&CK frameworks and CVE databases.
- Why integrate: Automates security alerts into Jira tickets, saving time and reducing errors.
- Who it’s for: Cybersecurity teams, SOC analysts, incident responders, and Jira admins.
- How to start: Requires admin permissions in Jira, API tokens, and basic security workflow knowledge.
Benefits:
- 80% faster threat research.
- Save 45+ minutes weekly by automating ticket creation.
- Real-time updates between systems for better collaboration.
Ready to streamline your cybersecurity operations? Let’s dive into the step-by-step integration process.
Setting Up The Security Bulldog for Jira Integration
Before connecting The Security Bulldog to your Jira instance, it’s important to complete a few key steps. These prerequisites will help avoid common issues with authentication and permissions, ensuring the integration process runs smoothly.
Prerequisites for Integration
To start, confirm that you have the required access levels. You’ll need Space Admin or Jira Administrator permissions to install apps and configure security settings within your Jira environment. The Security Bulldog is compatible with both Jira Cloud (SaaS) and Jira Data Center/Server, supporting Data Center versions up to 10.
For Jira Cloud, generate an API token. If you’re using Jira Server or Data Center, you’ll need a password or personal access token. It’s best to set up the integration using a dedicated service account for consistency and reliability.
Take note of your Jira Project Key (e.g., "SEC") and decide which issue types – like Task, Bug, or Epic – should map to the incoming threat data. Additionally, ensure the integrating user has the necessary permissions, including "Browse Projects", "Create Issues", and "Add Attachments" for the target project. For added security, store your API tokens in a secure secrets manager and rotate them every 90 days.
Configuring The Security Bulldog Settings
Log into The Security Bulldog platform with admin credentials and navigate to the Integration Settings section. Here, you’ll configure the parameters that allow the platform to communicate with your Jira instance via the Jira REST API (version 3 for Cloud or version 2 for Server).
Enter your Jira URL, Project Key, and API token or credentials, then click Test Credentials to confirm the connection.
If you’re using OAuth 2.0 instead of basic API tokens, you’ll need to generate a Client ID and Client Secret from the Jira developer console. Make sure the app permissions include the scopes read:jira-work and write:jira-work. These credentials will enable The Security Bulldog to automate ticket creation and management within Jira.
Once the platform is configured, you can adjust your Jira settings to enable smooth data integration.
Preparing Jira for Integration
In Jira, activate the Security feature by navigating to your project’s Settings > Features. This will add a dedicated security tab to display threat intelligence updates from The Security Bulldog.
"Authentication tells Jira Cloud the identity of your integration, and authorization determines what actions it can take within Jira." – Atlassian Developer Documentation
Next, customize your Jira workflow to include statuses that match your security processes, such as "Open", "In Progress", and "Resolved." These statuses will align with The Security Bulldog’s threat statuses during the integration. If you have Jira Administrator permissions, you can allow the platform to automatically create webhooks. These webhooks enable real-time status synchronization instead of relying on hourly updates. It’s a good idea to retain these webhooks to ensure seamless, up-to-date data integration.
Steps to Integrate The Security Bulldog into Jira
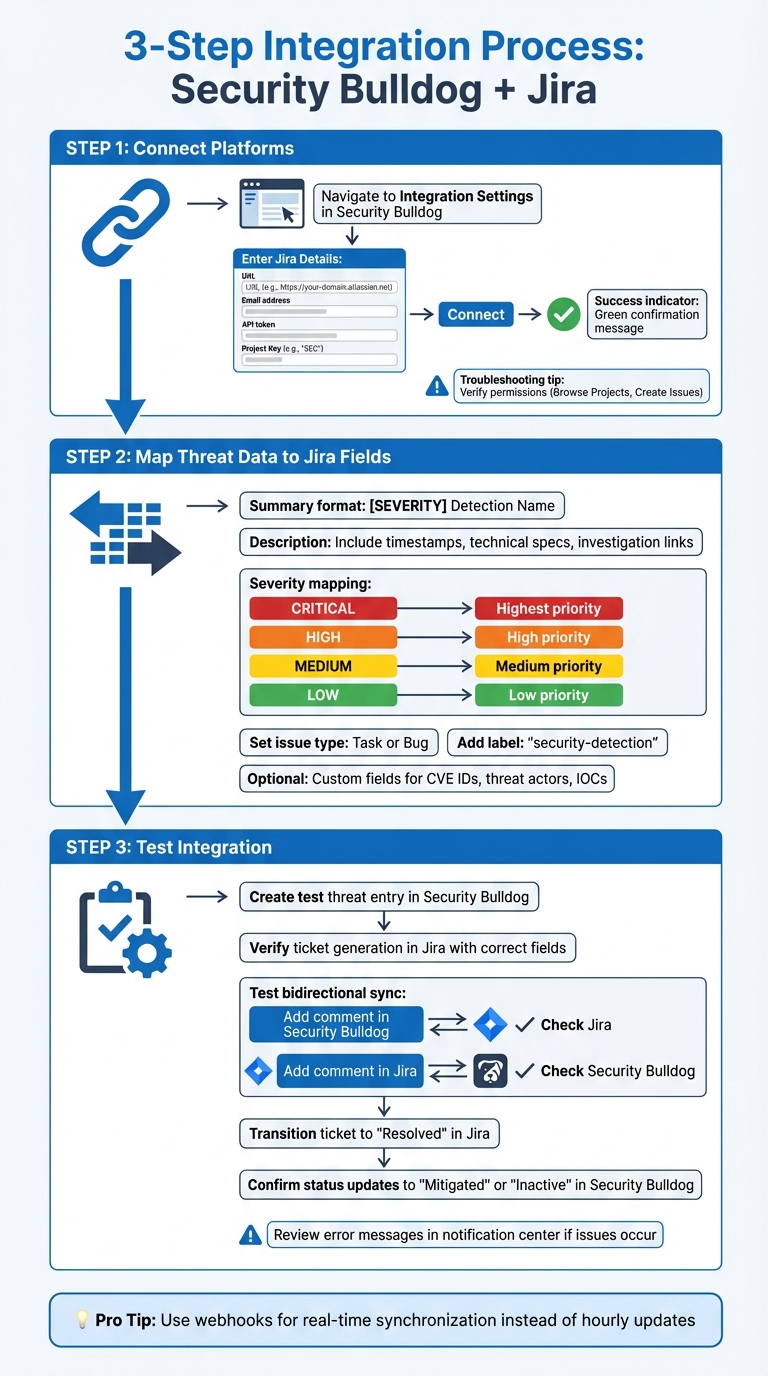
Step-by-Step Guide to Integrating Security Bulldog with Jira for Cybersecurity Teams
Once you’ve set up the necessary prerequisites and configured both platforms, you’re ready to connect The Security Bulldog to Jira and start sending threat intelligence data directly into your Jira tickets.
Connecting The Security Bulldog to Jira
Head back to The Security Bulldog platform and find the Integration Settings section. Here, you’ll need to input your Jira details: the URL (e.g., https://your-domain.atlassian.net), your email, API token, and the Project Key (e.g., "SEC").
Click Connect to authenticate. The Security Bulldog will use Jira’s REST API to establish the connection. If everything checks out, you’ll see a green confirmation message. If you encounter errors, double-check that your API token is correct and that the integration account has the required permissions: Browse Projects and Create Issues.
Mapping Threat Intelligence to Jira Tickets
After successfully connecting, it’s time to decide how threat data will populate Jira ticket fields. For the summary field, use a format like [SEVERITY] Detection Name to make threat tickets easy to spot in your backlog. The description field should include detailed information, such as timestamps, technical specs, and investigation links.
You’ll also need to map The Security Bulldog’s severity levels to Jira’s priority system:
- CRITICAL threats → Highest priority
- HIGH threats → High priority
- MEDIUM threats → Medium priority
- LOW threats → Low priority
Set the issuetype to match your workflow, such as "Task" or "Bug", and consider adding a label like "security-detection" to streamline filtering and assignment. If your team needs more specific tracking, you can create custom Jira fields for data like CVE IDs, threat actor names, or Indicators of Compromise (IOCs).
Once the mapping is complete, you’re ready to test the integration.
Testing the Integration
Create a test threat entry in The Security Bulldog to generate a Jira ticket with all the mapped fields. Check that the severity, descriptions, and metadata appear correctly in both systems.
Next, add a comment to the test finding in The Security Bulldog and confirm it syncs to the linked Jira ticket. Then, try the reverse: add a comment in Jira and verify it shows up in The Security Bulldog. Finally, transition the Jira ticket to "Resolved" and ensure The Security Bulldog updates the threat status to "Mitigated" or "Inactive." If tickets fail to generate, review error messages in The Security Bulldog’s notification center to troubleshoot.
"Real-time, bidirectional synchronization is crucial to ensure both systems remain perfectly aligned without manual intervention." – Jose Amoros, TestQuality
Best Practices for Managing Cybersecurity Tickets in Jira
Automating Threat Intelligence Workflows
Leverage Jira Automation to streamline the creation and assignment of cybersecurity tickets. For instance, when The Security Bulldog sends threat data via incoming webhooks, Jira can automatically generate issues using smart values like {{webhookData.alertTitle}} to fill in summaries and descriptions. Limit these automated triggers to threats marked as "High" or "Critical" severity to reduce unnecessary alerts and avoid overwhelming your team with low-priority tickets.
You can also use post-functions in Jira workflows to automate follow-up actions. For example, when a ticket transitions from "In Progress" to "Resolved", you can update custom fields with the latest mitigation details or trigger notifications to inform stakeholders. Clearly align threat severity levels with Jira’s priority system, so your team can quickly understand the urgency of each issue without needing to dig into the details.
Fine-tuning ticket categorization is the next step to ensure your incident response process runs smoothly.
Prioritizing and Categorizing Tickets
With automated workflows in place, focusing on effective ticket categorization can further enhance response times. Start by generating tickets only for threats classified as "High" or "Critical", and expand to include additional categories as your processes mature. Use Jira Query Language (JQL) to create custom queues based on security labels and priority levels. For example, filter tickets tagged with "security-detection" or "threat-intel" to separate security-related tasks from general IT requests.
These priority-based queues can also support Service Level Agreement (SLA) goals, ensuring that critical vulnerabilities are addressed promptly. By structuring your ticketing system this way, you can focus resources on the most pressing issues without losing track of less urgent tasks.
Collaborating Across Teams
Collaboration is essential for managing cybersecurity tickets efficiently. Start by integrating The Security Bulldog with Jira’s Security tab, giving both security and development teams a shared view of vulnerabilities. Include replay links in tickets to provide quick access to original intelligence reports, helping team members understand the context of each issue. For major incidents, use Stakeholder Groups to automate notifications to non-technical departments, keeping leadership informed without requiring manual updates.
To encourage real-time collaboration, integrate Jira with communication tools like Slack or Microsoft Teams. This allows teams to discuss tickets and receive updates directly in their primary communication channels. Additionally, set up automation rules to route tickets to the appropriate teams based on metadata. For example, assign tickets tagged as "infrastructure" to network security teams and those marked as "application vulnerability" to AppSec teams. Standardized responses can also help maintain consistent communication across all teams involved.
These practices not only improve efficiency but also ensure that everyone stays aligned, making it easier to tackle cybersecurity challenges as a unified group.
sbb-itb-9b7603c
Troubleshooting Common Integration Issues
Connection and Authentication Errors
If you’re running into 401 Unauthorized errors, it usually means your authentication credentials are incorrect. For Jira Cloud, make sure you’re using an API token along with your email address instead of a password. For Jira Data Center or Server, you’ll need either a username and password or a Personal Access Token (PAT). If the error persists despite using the correct credentials, you might need to clear a CAPTCHA challenge. To do this, log in through a web browser and try the integration again.
403 Forbidden errors point to permission problems. The Jira user account set up for the integration must have specific permissions like "Link Issues", "Post Comments", and "Transition Issues" for the relevant projects. Check the Jira Audit Logs to find out which actions are failing. Look for statuses like "SOME ERRORS" or "FAILURE" to zero in on the issue. If your organization restricts access by IP address, ensure The Security Bulldog’s IP addresses are added to your Jira allowlist.
For SSL certificate verification failures, confirm that your Jira server uses a publicly trusted SSL certificate with a complete certificate chain. Self-signed or incomplete certificates can block secure integrations. To test connectivity, use a curl command to check if your API token and user credentials can access the Jira REST API outside the integration interface.
Data Mapping Discrepancies
If threat intelligence data isn’t displaying correctly in Jira tickets, start by examining the integration’s execution history. Warning icons (⚠️) often provide details about why data failed to map or import. Use the "View Raw Data" screen to compare the source data with the Jira output – missing fields typically point to configuration errors in your mapping settings.
One common issue is date format mismatches. The format in your integration settings must match the source data exactly. For instance, d/MM/yyyy H:mm is not the same as d/MM/yyyy HH:mm, and even minor differences can cause the import to fail. Also, double-check that you’re using standard double quotes (") instead of "Smart Quotes" (curly quotes), as these can lead to errors during processing.
After ticket creation, use Jira Query Language (JQL) to identify gaps in data. Queries like description IS EMPTY or assignee IS EMPTY can help you find where mapping failed to populate essential fields. If you notice data shifted into the wrong fields or combined incorrectly, review your delimiter settings. Ensure you’re using a qualifier character (like double quotes) to enclose text that contains commas. Once mapping issues are resolved, consider the system’s performance and scalability for smoother operations.
Performance and Scalability Concerns
For managing large volumes of threat intelligence, leverage JQL with "ORDER BY" clauses to sort tickets by rank or priority. This allows your team to focus on the most critical threats without overloading the system with unnecessary data. Create Jira Dashboards with two-dimensional filter gadgets to visualize datasets across categories such as "Value vs. Effort" or "Urgency vs. Importance".
Regularly archive completed tickets to keep your database streamlined. Use Jira’s Site Optimizer to maintain system health by clearing out old data, optimizing fields, and managing spaces and work types. If you need to update multiple tickets, take advantage of bulk edit, move, or transition features instead of handling them one by one.
Keep an eye on external tool connections to avoid delays, and use distinct colors for priority levels to make issue identification faster. Following Atlassian’s recommended data limits and guardrails for work items will help prevent system slowdowns as your ticket volume increases.
Conclusion
Summary of Integration Benefits
Bringing The Security Bulldog into Jira creates a centralized hub for managing threats, seamlessly tying alerts to work items and embedding security into your development workflow. This setup promotes real-time collaboration, allowing teams to track and update issues together efficiently.
With webhooks and no-code automation, Jira issues are created instantly, complete with alert details – removing the need for tedious manual entry. This smooths the process from detection to resolution. Real-time dashboards add another layer of value, offering insights into service performance, response times, and threat trends. These tools help managers quickly pinpoint and address bottlenecks.
The integration also aligns with ITIL principles for managing incidents, problems, and changes. As Igor Potrusaev, Solution Partner at BDQ, explains:
"JSM offers one of the most straightforward and efficient ways to build an ITIL-compliant service desk, even for teams with minimal ITIL expertise".
These features collectively create a strong foundation for taking actionable next steps.
Next Steps and Resources
To maximize the benefits of this integration, consider the following steps. With the integration now live, use Jira Automation rules to automatically create issues when alerts are triggered. Schedule synchronization intervals between 60 and 1,440 minutes to ensure threat data stays up to date. Double-check that severity levels are mapped correctly to Jira priorities for accurate issue tracking.
Enable Jira’s Security and Development features to incorporate vulnerabilities directly into sprint tasks. For additional efficiency, integrate Jira with Confluence to establish a self-service knowledge base. This resource can help your team address common security fixes and reduce ticket volume.
For pricing, the Enterprise plan starts at $850/month for up to 10 users. It includes features like access to the MITRE ATT&CK framework, a CVE database, an NLP engine, and 24/7 support. Larger teams can explore the Enterprise Pro plan, which offers custom pricing tailored to their needs.
FAQs
What permissions do I need to integrate The Security Bulldog with Jira?
To get The Security Bulldog working smoothly with Jira, you’ll need Jira access and the right administrative or project-level permissions. The person handling the setup should either have global administrator rights or, at the very least, the ability to create issues and upload attachments in the relevant Jira project.
If the integration involves external authentication, like OAuth 2.0, you’ll also need the authority to approve and configure those connections. Having these permissions ready will make the setup process quicker and help you steer clear of any access problems.
How does The Security Bulldog help prioritize threats in Jira?
The Security Bulldog leverages AI-powered threat intelligence to dig deep into your Jira tickets, identifying and prioritizing high-risk threats automatically. This means your security team can zero in on the most pressing issues without sifting through endless data.
By simplifying threat analysis and response processes, The Security Bulldog boosts your team’s efficiency, ensuring potential risks are tackled promptly and effectively.
What can I do if The Security Bulldog isn’t integrating with Jira?
If The Security Bulldog isn’t syncing with Jira, the first step is to double-check the connection and configuration settings. Make sure everything is set up correctly and that permissions are aligned to allow the two tools to communicate. It’s also important to confirm that the necessary authorizations between the platforms are in place.
Still having trouble? Try reconnecting the tools using an incognito browser. This can help bypass cached data or cookies that might interfere with the integration. Another thing to check is whether Jira’s services are running smoothly – any downtime or service disruptions could be causing the problem. For a deeper dive, you could create a new Jira project and test the integration there to see if any restrictions or misconfigurations are at play.
If these steps don’t fix the issue, it’s a good idea to loop in your system administrator or tap into Jira’s support resources for more help.